Step 6: Align the parts


Now that you've made the parts for AlarmClockView, change the size and placement of the parts so the user interface looks better.
Resizing parts
To resize a part:
1. Click on the part so its handles appear. Handles are filled boxes on the corners and sides of a selected part.
2. Using mouse button 1, drag one of the handles to resize the part.
3. Release mouse button 1.
Rearranging parts
To move parts around, do one of the following:
•Select a part and use the mouse to drag the part to the desired location
•Select a part and use the keyboard arrow keys to move the part to the desired location
Aligning parts
To align parts:
1. Select the parts. Be sure to select last the part with which the others will line up.
To select more than one part on Windows(R) platforms hold down the Shift key and click on the parts using mouse button 1. On UNIX hold down the Ctrl key, and click on the parts using mouse button 1.
2. Select an alignment icon in the tool bar. The alignment icons include:


If you make an undesirable choice, you can revert back to a previous display by selecting Undo from the Edit menu.
Evenly spacing parts
To space several parts evenly across or down a window:
1. Select the parts.
2. Select a distribution icon in the tool bar. The distribution icons include:


Copying a part's width or height
To make parts the same width or height:
1. Select the parts. Be sure to select last the part which will be the model for the others.
2. Select a sizing icon in the tool bar. The sizing icons include:


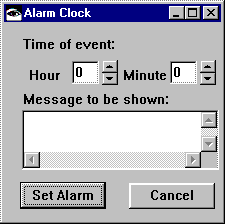
When you finish changing the parts' size and placement, the window in AlarmClockView should resemble the following:


Last modified date: 08/01/2019