Example: Open and save files


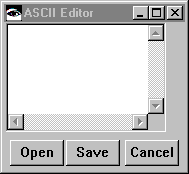
Suppose you have an ASCII editor that looks like the following:


It uses a File Selection Prompter part to open and save text files.
Adding the using interface
Begin by creating an application, adding a visual part to it, and opening a Composition Editor on the visual part. Next, add the following parts to the Window part shown in the Composition Editor:
•A Multi-line Edit  in
in  category
 in
in  category
 •Three Push Buttons  in
in  category
 in
in  category
 After you add the parts, change their labels and arrange them so the user interface looks like the following:


You may also want to change the settings of the Multi-line Edit part so the wordWrap property is True.
Adding the File Selection Prompter part
Now, select  (Prompter category) and
  (File Selection Prompter part). Then, click on the free-form surface.
 (Prompter category) and
 Adding scripts to open and save files
To open a text file, add a script that uses the method open: of the class CfsReadFileStream:
1. Select the  icon in the lower-right corner of the Composition Editor.
 icon in the lower-right corner of the Composition Editor.
 2. In the Script Editor that opens, select New Method Template from the Methods menu.
3. Replace the template in the Script pane with following code:
showFile: file
| fileStream text |
(file = nil or: [ file isEmpty])
ifTrue: [^self]
ifFalse:
[fileStream := CfsReadFileStream open: file.
text := (fileStream upToEnd) trimSeparators.
fileStream close.].
(self subpartNamed: 'Multi-line Edit1') string: text.
If you've changed the name of the Multi-line Edit part, change the last line of code so it uses your name for the part instead of Multi-line Edit1. You can click on  to open the Subpart Features Syntax tool and see what you named the part in the Subparts pane.
 to open the Subpart Features Syntax tool and see what you named the part in the Subparts pane.
 4. Save the script. Click mouse button 2 on the lower pane, and select Save from the pop-up menu. (On UNIX, use mouse button 3.)
Next, repeat steps 3 and 4, except add the code below so your application can save files to disk. The code uses the method openEmpty: of the class CfsReadWriteFileStream.
saveFile: file
| content fileStream |
content := (self subpartNamed: 'Multi-line Edit1') object.
(file = nil)
ifTrue: [^self]
ifFalse:
[fileStream := CfsReadWriteFileStream openEmpty: file].
(fileStream size = 0)
ifFalse: [^self]
ifTrue: [fileStream nextPutAll: content].
fileStream close.
Again, if you've changed the name of the Multi-line Edit part, change Multi-line Edit1 so it uses your name for the part.
Making connections
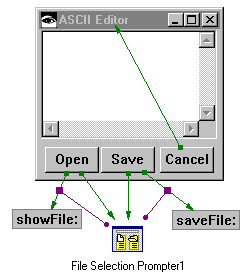
After you add the scripts, select make the following connections:
•Connect the clicked event of the Open push button to the prompt action of the File Selection Prompter part.
•Connect the clicked event of the Save push button to the prompt action of the File Selection Prompter part.
•Connect the clicked event of the Open push button to the showFile: script.
•Connect the parameter1 attribute of the clicked-showFile: connection to the selectedFileName attribute of the File Selection Prompter part.
•Connect the clicked event of the Save push button to the saveFile: script.
•Connect the parameter1 attribute of the clicked-saveFile: connection to the selectedFileName attribute of the File Selection Prompter part.
•Connect the clicked event of the Cancel push button to the closeWidgetaction of the Window part.
After you make the connections, the parts and connections resemble the following:


Fine-tuning: Attaching parts
You can now run the application. To ensure that the Multi-line Edit part resizes itself when you change the window's size, change the framingSpec settings of the Multi-line Edit part to make attachments such as the following:
•Attach the bottom edge of the Multi-line Edit part to top edge of a target part such as the Open push button, with an offset of 10.
•Attach the right edge of the Multi-line Edit part to the right edge of the parent (Window), with an offset of 10.
Make similar attachments in the push button settings. Remember, attach two widgets only once. That is, don't attach the bottom of the Multi-line Edit to the top edge of the Open push button in the settings for both parts. Otherwise, you get an error.
You can also change the wordWrap property of the Multi-line Edit part to true.
Last modified date: 03/28/2020