Using OLE Client parts
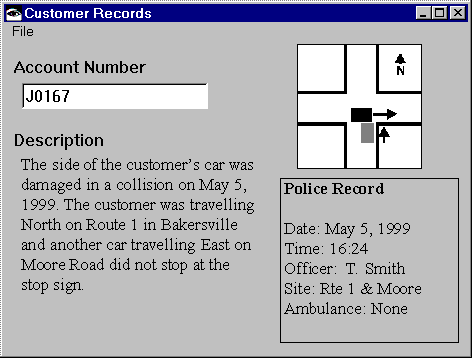
In this section, you build an application that uses OLE Client parts to run Windows text and graphics editors. The finished application will look like the following:


Begin by creating an application named ClientRecordsApp. Add a visual part to the application, and name it ClientRecordsView.
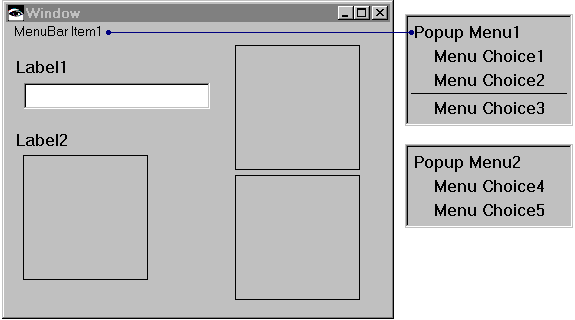
In the Composition Editor, add a menu bar, a text pane, two labels, and three OLE Client parts to the window. The OLE Client part is in the OLE category. Also, add three menu choices and a separator to the popup menu. Next, add a second popup menu and add two menu choices to it. After you add the parts, your Composition Editor shows the following:


Resize and align the parts. Next, change the parts' labels and names:
•Change the window's title bar to Customer Records.
•Change the menu bar item to File.
•Specify Account number and Description for the labels.
•For the popup menu connected to the menu bar, specify Restore..., Copy, and Save... in descending order for the menu choices.
•For the free-standing popup menu, specify Insert Object... and Paste in descending order for the menu choices.
•Change the name of the OLE Client part below Description to Description. Similarly, rename the OLE Client part in the upper-right of the window to Bitmap and rename the OLE Client part in the lower-right of the window to Records.
Change the settings for the Description OLE Client part to the following:
1. For clientName, select a text editor such as Microsoft Word or WordPad. clientName can automatically initialize an OLE Client view.
2. For decorationPolicy and focusDecorationPolicy, specify XmNONE to remove the part's borders.
Change the settings for the Bitmap OLE Client part:
1. For sourcePath, specify a bitmap residing on your workstation. Note that when you specify a value for sourcePath, you instruct the OLE Client to always access the same file. sourcePath can automatically initialize an OLE Client view.
Note:
Were you to specify values for both clientName and sourcePath, the OLE Client would initialize based upon the sourcePath.
2. For clientType, specify XmLINKED.
A linked clientType has a pointer to a file so if the file is updated, the OLE Client can access the updated version. An embedded clientType (uses XmEMBEDDED) accesses a copy of the file as it exists at the time of embedding, so the OLE Client does not access a file updated later. When you do not specify a value for clientType, the clientType of the target OLE Client container is used. If you specify XmLINKED but do not supply a valid sourcePath, the clientType of the underlying OLE Client part will be XmEMBEDDED. Linked OLE Clients must have a valid source path.

The updateFromLink action of an OLE Client part can be used to update a linked OLE Client from its source document. Whenever the source document is updated, the linked OLE Client gets the updated version. This example application, as we've defined it, will not use the updateFromLink action. However, you might try using the updateFromLink action in your own OLE applications.
3. Ensure that enableVerbsMenu is set to true, the default. The OLE Client will have whatever verbs menu choices your system provides on the OLE Client's popup menu.
So the Description OLE Client parts can use the popup connected to File, make the following connections:
•Connect the self attribute of the popup menu connected to File to the menu attribute of the Description OLE Client part.
•Connect the self attribute of the menu bar item to the oleFileMenuView attribute of the window. This connection makes the File menu available to an active embedded OLE client.
Note:
An OLE Client part also provides attributes for making a Container menu (oleContainerMenuView) or a Window menu (oleWindowMenuView) available to an active embedded OLE client.
The two connections to the popup menu must be in the correct order. To check the order, press mouse button 2 on the popup menu and, from its popup menu, select Reorder Connections From. In the Reorder connections window, ensure that the connection to the OLE Client part precedes the connection to the menu bar item. If it does not, drag it to the appropriate position using mouse button 1.
If you now test ClientRecordsView, you'll notice that pressing mouse button 2 on the Description OLE Client part displays the popup menu connected to File. Pressing mouse button 2 on the Bitmap OLE Client part displays a popup menu with options that open a graphic editor, provided you have a program such as Microsoft Paint on your system. Had you set sourcePath to a text file instead of a bitmap, then a text editor would have opened. This popup menu is the OLE verbs menu.
Next, make connections that enable you to access Windows applications by selecting menu choices on the two popup menus added to the free-form surface:
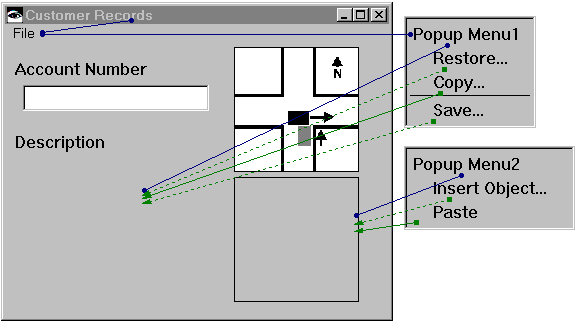
•Connect the self attribute of the free-standing popup menu to the menu attribute of the Records OLE Client part.
•Connect the clicked event of Insert Object... to the promptInsertObject: action of the Records OLE Client part. The promptInsertObject: action accepts one parameter, the clientType of the object to be inserted.
•Connect the clicked event of Paste to the paste action of the Records OLE Client part.
•Connect the clicked event of Restore... to the restoreFromFile: action of the Description OLE Client Part. The restoreFromFile: action accepts a string parameter that is the name of the file where the receiver OLE object will be stored. If a file name is not given, restoreFromFile: displays a file prompter.
•Connect the clicked event of Copy to the copy action of the Description OLE Client Part.
•Connect the clicked event of Save... to the saveToFile: action of the Description OLE Client Part. The saveToFile: action accepts a string parameter that is the name of the file where the receiver OLE object will be stored. If a file name is not given, saveToFile: displays a file prompter.
Note:
The restoreFromFile: and saveToFile: actions use instances of the class OleFile to retrieve or save OLE objects into OLE compound files. The OLE File part on the palette provides a more complete interface for manipulating OLE structured storage.
When you finish, the Composition Editor shows:


Last modified date: 05/15/2020