Creating business expenses
To provide a way for creating business expenses for the report, you need to create an object model for business expenses, add an OrderedCollection to your application to hold the expenses, add an interface to your window for displaying business expenses, and create an object-factory for adding the expenses to the ordered collection in your application.
Creating an object model
The object model that you create will be a new class that has attributes for each type of business expense to be reported on: date, reason, airfare, room, meals, and misc. To create an object model for business expenses, follow these steps:
1. In the Organizer, add a part to your application. Name the part BusinessExpense and select Smalltalk class from the Part type list and Object from the Inherits from list.
The Script Editor opens on your new part.
2. Switch to the Public Interface Editor and select the Attribute tab to add the following attributes to your class: date, reason, airfare, room, meals, and misc.
a. Type the name of each attribute in the Attribute name field.
b. Select the Add with defaults push button.
c. Modify the Attribute data type field as follows for each attribute:
Attribute
Attribute data type
date
Date
reason
String
airfare, room, meals, misc
ScaledDecimal
d. For each attribute you modify, select the Update button.
3. To generate the attributes and default getter and setter methods, select Generate Default Scripts from the File menu, and in the window that displays select the Generate all push button.
If you switch back to the Script Editor now, you will see that the attributes have been added to the class definition, and public instance methods have been generated for each attribute.

You may need to toggle one of the method buttons on the Script Editor to make the new attributes and methods appear.
4. Save your new part and close the editor.
You will use these attributes later to help generate the user interface for creating business expense items.
Adding an OrderedCollection
1. In the Composition Editor for BusinessExpenseView, add an ordered collection to your visual part.

To add an ordered collection, select the Models category on the parts palette, and then select the OrderedCollection part and add it to the free-form surface.
2. Change the name of the ordered collection part to BusinessExpenseCollection by selecting Change Name from the part's pop-up menu.
Creating an object factory
An Object Factory is a VA Smalltalk part available in the Models category of the parts palette. It creates new instances of a class. You can use an object factory in the business expense reporting application to create new instances of the class BusinessExpense and add them to BusinessExpenseCollection.
To create an object factory for the BusinessExpense part you just created, follow these steps:
1. In the Composition Editor containing BusinessExpenseView, Add an Object Factory part to the free-form surface.
2. Open the settings of the object factory and set the instanceClass to BusinessExpense and the partName to BusinessExpenseFactory.
Adding the user interface
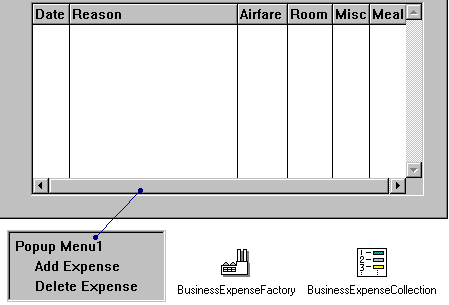
To provide a user interface for adding BusinessExpense items to the BusinessExpenseCollection add a new container details part, container details columns, and pop-up menus part to your window as follows:
1. Select the Container Details part from the Lists category of the parts palette and drop it onto the window.
2. To set up the columns you will need for each type of business expense you can record, display the container details part's pop-up menu and select Initialize columns Based On A Type. In the window that displays, type Business Expense.
The Initialize columns Based On A Type menu item creates one column for each instance variable that you specified when you created the Business Expense part.
3. To make your container look nice, you can do the following:
a. Change the column labels to Date, Reason, Airfare, Room, Meals and Misc. by holding down the Alt key and selecting the column heading with mouse button 1, then directly editing the heading.
b. Resize each column to make the Reason column as wide as possible, by selecting the resize handles for each column and dragging them to the width you want.
You can also open the settings for each column to set the converter as follows:
Column
Data type
Date
Date
Reason
String
Airfare, Room, Meals, Misc
Decimal
4. Open the settings for the Container Details part. Change the selectionPolicy property to XmCELLSINGLESELECT
5. Add a Popup Menu part to the free-form surface of the Composition Editor and give it two Menu Choice parts labeled Add Expense and Delete Expense.
6. To add the menu to the Container Details part, connect the menu's self attribute to the Container Details part's menu attribute. This connection displays the menu when you place the mouse pointer over the container and press button 2.
This part of your user interface should appear as follows in the Composition Editor:


Making the connections
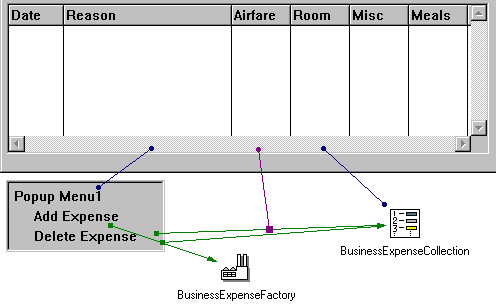
To connect the object factory, ordered collection, table, and menu, do the following:
1. Make the following connections from the Add Expense menu item:
a. Connect the clicked event to the object factory's new action.
b. Connect the normalResult attribute of the connection to the ordered collection's add: action.
2. To display new business expenses in the container details part, connect the ordered collection's self attribute to the container details' items attribute.
3. Make the following connections from the Delete Expense menu item:
a. Connect the clicked event to the ordered collection's remove: action.
b. Connect the container details part's selectedItem attribute, to the dashed connection line's anObject attribute.
This part of your user interface should now appear in the Composition Editor as follows:


If you test your window, you should see a window very similar to the first illustration in this chapter. You can add information to the table as follows:
4. Select a name from the Name drop-down list.
5. Select Add Expense from the table's pop-up menu.
6. Click in the Date column and type a date, then tab to the next column and type an amount. Continue tabbing through the columns until you have entered information in each one.
7. Select Add Expense again to add another row of information to the table.
Last modified date: 05/18/2020