Defining a client user interface
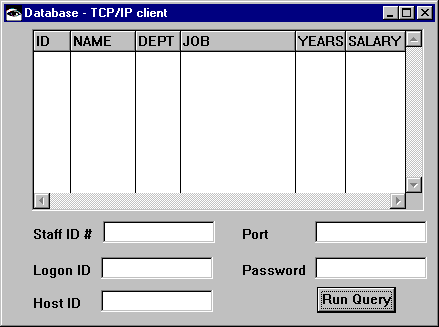
The example described in this section has a client user interface for displaying data in the database. You use VA Smalltalk visual parts to define the client UI. When you finish this section, the client UI resembles:


To define the client UI, add a visual part to MyDatabaseTCPIPApp and name it, for example, MyClientView.
In a Composition Editor open on MyClientView, do the following:
1. Change the Window part's title to Database-TCP/IP client.
2. Drop a Container Details part on the window and add to it six Container Details Column parts.
3. Change the settings for the left-most column. Specify ID for attributeName and heading, and String for converter. For the next column, specify NAME for attributeName and heading, and String for converter. For the next three columns, specify DEPT, JOB, then YEARS for the attributeName and heading properties of the respective parts. Finally, for the right-most column, specify SALARY for attributeName and heading, and Decimal for converter.
4. Add five Label parts and five Text parts to the window. Change the labels to Staff ID#, Logon ID, Host ID, Port, and Password.
Situate a Text part beside each label. Open the settings for the Staff ID# Text part and set notifyChangeOnEachKeystroke to false, and set partName to id. For the Logon ID Text part, set partName to logonId. For the Host ID Text part, set converter to String and partName to hostIdField. For the Port Text part, set converter to Integer, notifyChangeOnEachKeystroke to false, and partName to portField. For the Password Text part, set partName to password.
For the object properties of the Text parts, you might specify default values so users do not need to type them in later.
5. Add a push button to the window and change its label to Run Query.
6. Save your work.
Go to the Script Editor for MyClientView and add two instance methods:
data
data
^((self subpartNamed: 'logonId') object abrPadWithBlanks: 8),
((self subpartNamed: 'password') object abrPadWithBlanks: 8),
((ByteArray new: 2) uint16At: 0 put: (self subpartNamed: 'id') object;
yourself),
(String new: 2000)
formatData:
formatData: aString
| newString id name dept job years salary rec col |
( aString includes: $[ )
ifFalse: [ ^CwMessagePrompter
warn: 'No data was returned by server program' ].
newString := aString subStrings: $[.
id := (newString at: 2) abtWithoutOccurencesOf: $].
id := id abtWithoutOccurencesOf: $'.
name := (newString at: 3) abtWithoutOccurencesOf: $].
name := name abtWithoutOccurencesOf: $'.
dept := (newString at:4) abtWithoutOccurencesOf: $].
dept := dept abtWithoutOccurencesOf: $'.
job := (newString at: 5) abtWithoutOccurencesOf: $].
job := job abtWithoutOccurencesOf: $'.
years := (newString at: 6) abtWithoutOccurencesOf: $].
years := years abtWithoutOccurencesOf: $'.
salary := (newString at: 7) abtWithoutOccurencesOf: $].
salary := salary abtWithoutOccurencesOf: $'.
rec := (AbtCompoundType new name: '' ;
addField: (( AbtCCharArrayField new name: 'ID'; length: ( id size ) ));
addField: (( AbtCCharArrayField new name: 'NAME'; length: ( name size ) ));
addField: (( AbtCCharArrayField new name: 'DEPT'; length: ( dept size ) ));
addField: (( AbtCCharArrayField new name: 'JOB'; length: ( job size ) ));
addField: (( AbtCCharArrayField new name: 'YEARS'; length: (years size) ));
addField: (( AbtCOBOLPackedDecimalField new name: 'SALARY'; length: 10 ));
yourself ) newRecord.
rec at: 'ID' put: id;
at: 'NAME' put: name;
at: 'DEPT' put: dept;
at: 'JOB' put: job;
at: 'YEARS' put: years;
at: 'SALARY' put: salary asDecimal.
col := OrderedCollection new.
col add: rec.
(self subpartNamed: 'Container Details1') items: col.
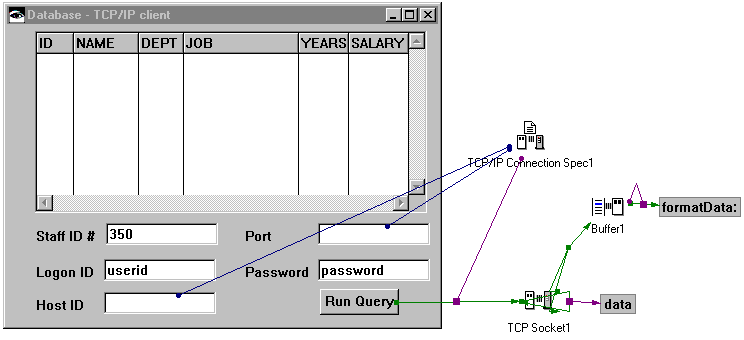
Next, return to the Composition Editor and add TCP/IP parts that enable you to connect to the host machine at a designated port:
1. Add a Buffer part, a TCP/IP Connection Specification part, and a TCP Socket part to the free-form surface.
2. Open the settings for the TCP/IP Connection Specification and specify a host name and a port number.
To enable connections to the server machine, make the following connections:
3. Connect the hostId attribute of the TCP/IP Connection Specification to the object attribute of the Host ID text field.
4. Connect the port attribute of the TCP/IP Connection Specification to the object attribute of the Port text field.
5. Connect the clicked event of the Run Query push button to the connect action of the TCP Socket.
6. Connect the spec parameter of the clicked-connect connection to the self attribute of the TCP/IP Connection Specification.
7. Connect the sent event of the TCP Socket to the receiveWithLengthInData action of the TCP Socket.
8. Connect the normalResult parameter of the sent-receiveWithLengthInData connection to the initializeWith action of the Buffer.
9. Connect the connected event of the TCP Socket to the sendIncorporatingLength: action of the TCP Socket.
10. Connect the sendDataObject parameter of the connected-sendIncorporatingLength: connection to the data script.
11. Connect the changed event of the Buffer to the formatData: script.
12. Connect parameter1 of the changed-formatData: connection to the contentsAsString attribute of the Buffer.
After you complete the connections, your work resembles:


When you test MyClientView, you now see values specified for hostIdField and portField.
Last modified date: 02/27/2018