Testing your new part
To test your new part:
1. Create a new application named MyTestSamplePartsApp.
2. Create a new visual part named MyTimerTestView.
3. In the Composition Editor, from the Options menu select Add Part. Type MyTimer in the Class Name field. (It's okay to leave the Part Name field empty.)
4. Select the Part radio button, and select OK.
5. Drop the timer part in any open area of the free-form surface.
This adds a timer part to your test application. Next, add parts and connections that will test the timer:
1. Add a Text part, a Label part, and a Toggle Button part.
2. Change the text of the Label part to Interval.
3. Change the label on the Toggle Button part to Repeat.
4. Open the settings on the Text part and change the converter property's data type to Integer.
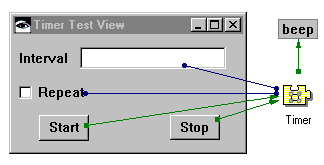
5. Connect the Text part's object attribute to the timer's length attribute.
6. Connect the timer's repeat attribute to the Toggle Button part's selection attribute.
7. Add two Push Button parts, labeled Start and Stop. Connect one Push Button part's clicked event to the timer's start action. Connect the other Push Button part's clicked event to the timer's stop action.
To test whether or not the timer is working properly, connect its timerFired event to a script like the following one:
beep
"Make a short beep"
CgDisplay default bell: 20.
When you have made all the connections, your test view looks like the following:


Now test your work. Type 1000 in the Interval field, and select the Start push button.
Did the bell ring? If not, check each of the connections you made, and be certain you did not omit any connections. Also check each of your methods, to be certain the code is implemented as described earlier.
Last modified date: 07/22/2020