Building the server application
Building the server application is a more complex exercise than building the client. First, much of the implementation must be done in scripts, because the VA Smalltalk TCP/IP parts are aimed at building client applications.
Your server application must always be listening for a call and it must provide some mechanism for halting communications. With these requirements and structure in mind, let's go ahead and build the TCP/IP server application.
In the Organizer window, create a new visual part in MyTCPSampleApp named MyTCPSampleServerView. When the Composition Editor window opens, switch to the Public Interface Editor.
Defining the attributes
The server application needs to manipulate the data that is received, send it back to the client, and keep track of when it should halt communications. In this section you will define attributes for these items and have the VA Smalltalk script generator build some of the necessary scripts.
Switch to the Attributes page and add the attributes as follows:
1. To add the dataReceived attribute, do the following:
a. Type dataReceived in the Attribute name field.
b. Select Defaults.
c. Type String in the Attribute data type field.
d. Select Add.
2. Add the dataSent attribute in the same manner, typing String in the Attribute data type field.
3. Add the closeServer attribute in the same manner, typing Boolean in the Attribute data type field.
Creating the scripts
Now that the attributes are defined you can generate the default scripts. From the File menu, select Generate Default Scripts. When the Generate Default Scripts window appears, select Generate all.
Switch to the Script Editor.
The default setter scripts for the attributes can be used without any changes. However, the getter scripts need to be changed to establish default values for the attributes. Make these changes as follows:
Change the closeServer script so it looks like the following:
closeServer
"Return the value of closeServer."
closeServer isNil ifTrue: [ self closeServer: false].
^closeServer
Change the dataReceived script so it looks like the following:
dataReceived
"Return the value of dataReceived."
dataReceived isNil ifTrue: [ self dataReceived: ' '].
^dataReceived
Change the dataSent script so it looks like ths following:
dataSent
"Return the value of dataSent."
dataSent isNil ifTrue: [ self dataSent: ' '].
^dataSent
Add the following script to allow the user to halt communications:
stopServer
"Stop the server"
self closeServer: true
Add the following script that will run when the user starts the server:
startServerName: aServerName usingPort: aPortNumber
"Start a TcpIp server, aServerName, using port, aPortNumber"
| host address result clientSocket dataSet svrSocket |
"Create the host"
(host := AbtTCPInetHost getHostByName: aServerName)isCommunicationsError
ifTrue: [Transcript cr;
show: (host codesAsString).
^self].
Transcript cr; show: 'Host name obtained'.
"Create the port"
(address := AbtTCPPort
usingHost: host
portNumber: aPortNumber)isCommunicationsError
ifTrue: [Transcript cr;
show: address codesAsString.
^self].
Transcript cr; show: 'Host port obtained'.
"Create the socket"
(svrSocket := AbtSocket newStreamUsingPort: address) isCommunicationsError
ifTrue: [Transcript cr;
show: svrSocket codesAsString.
^self].
Transcript cr; show: 'Host socket obtained'.
"Bind"
(result := svrSocket bind) isCommunicationsError
ifTrue: [Transcript cr;
show: result codesAsString.
^self].
Transcript cr; show: 'Host bind ok'.
(result := svrSocket listen: 10) isCommunicationsError
ifTrue: [Transcript cr;
show: (result codesAsString).
^self].
Transcript cr; show: 'Listen ok'.
"Continue listening until the server is stopped or an error occurs"
[self closeServer ] whileFalse: [
Transcript cr; show: 'Still listening. . .'.
(clientSocket := svrSocket accept) isCommunicationsError
ifTrue: [Transcript cr;
show: clientSocket codesAsString.
^self].
Transcript cr; show: 'Accept ok'.
(clientSocket isConnected)
ifTrue: [
(result := clientSocket receive) isCommunicationsError
ifTrue: [ Transcript cr;
show: result codesAsString.
^self]
ifFalse: [self dataReceived: (result asString).
Transcript cr; show: 'Server receive ok'.
self dataSent: (dataReceived asUppercase).
(result := clientSocket sendData: dataSent)
isCommunicationsError
ifTrue: [ Transcript cr;
show: result codesAsString.
^self]
ifFalse: [ Transcript cr;
show: 'Server send ok with data:'; cr;
show: (self dataReceived)].
]. "end of receive ok"
]. "end of connected ok"
"close the connection"
(result := clientSocket soclose) isCommunicationsError
ifTrue: [ Transcript cr;
show: 'Client'; cr;
show: (result codesAsString).
^self]
ifFalse: [ Transcript cr;
show: 'Client close ok'].
]. “end of closeServer = true loop”
“close the server’s socket”
(result := svrSocket soclose) isCommunicationsError
ifTrue: [ Transcript cr;
show: result codesAsString.
^self]
ifFalse: [ Transcript cr;
show: 'Server close ok'.
^self].
Creating the user interface
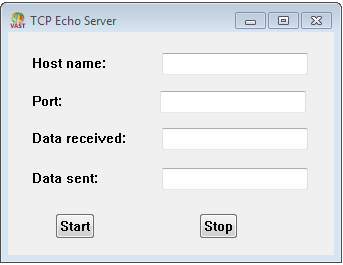
Switch to the Composition Editor. Create a view, using Text parts, Label parts, and Push Button parts that looks likes the following:

Open the settings for the Port Text part and under the converter attribute, change its Data type to Integer.
Making the connections
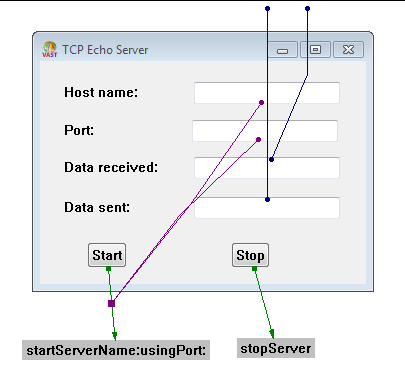
Make the connections as follows:
1. Connect the clicked event of the Stop push button to the stopServer script. The server will halt communications and close its socket whenever the user selects the Stop push button.
4. Connect the clicked event of the Start push button to the startServerName:usingPort: script.
a. Connect the object attribute of the Host name Text part to the parameter1 attribute of the event-to-script connection you just created.
b. Connect the object attribute of the Port Text part to the parameter2 attribute of the event-to-script connection you just created.
The server will now open the specified socket whenever the user selects the Start push button.
5. Connect the object attribute of the Data received Text part to the dataReceived attribute of MyTCPSampleServerView. The received data will now be visible to the user at the server machine.
6. Connect the object attribute of the Data sent Text part to the dataSent attribute of MyTCPSampleServerView. The data being sent to the client will now be visible to the user at the server machine.
When you are finished making the connections, your part will look like this in the Composition Editor:

Your server is now complete so save the part and close the Composition Editor.
Last modified date: 02/27/2018