Step 8: Connect parts and test it


If you click on  , the Test tool, the Alarm Clock window opens. But nothing happens when you click on a push button. To add function to the application, make two event-to-action connections and one attribute-to-attribute connection.
 , the Test tool, the Alarm Clock window opens. But nothing happens when you click on a push button. To add function to the application, make two event-to-action connections and one attribute-to-attribute connection.
 Closing Alarm Clock when Cancel is clicked
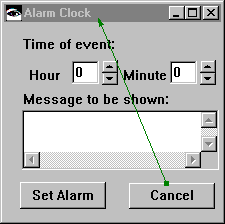
Connect the clicked event of the Cancel push button to the closeWidget action of the Window part. To draw the connection:
1. Using mouse button 2, click on the Cancel push button. (On UNIX, use mouse button 3.)
2. From the push button's displayed pop-up menu, select Connect > clicked.
3. Once you make the selection, you'll see  instead of your mouse pointer and a red line running from the push button to the
 instead of your mouse pointer and a red line running from the push button to the
4. Using mouse button 1, click on the title bar area of the Window part.
5. From the Window part's displayed pop-up menu, select closeWidget.
The connection appears as follows:


Now, if you click on  and then Cancel in the displayed Alarm Clock window, the window closes.
 and then Cancel in the displayed Alarm Clock window, the window closes.
 Opening the message box when Set Alarm is clicked
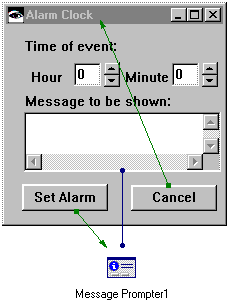
Repeat the above steps, except connect the clicked event of the Set Alarm push button to the prompt action of the Message Prompter part.
After you draw the connection, click on  and then Set Alarm to open the message box.
 and then Set Alarm to open the message box.
 Note that you'll be replacing this connection with a script. But adding the connection now enables you to test the Message Prompter part.
Enabling the message box to show the message
So the Message Prompter part knows what message to display, draw an attribute-to-attribute connection as follows:
1. On Windows using mouse button 2, click on the Multi-line Edit part. On UNIX platforms, using mouse button 3, click on the Multi-line Edit part.
2. From its pop-up menu, select Connect > All features.
3. In the displayed Connections window, select string from the list of attributes (middle pane); then select OK.
4. Click the  now shown on the Message Prompter part.
 now shown on the Message Prompter part.
 5. From its pop-up menu, select messageString.
After you draw the connection, your Composition Editor shows the following:


If you click on  , type a message into the multi-line edit field, and click on Set Alarm, you'll see the message in the displayed message box.
 , type a message into the multi-line edit field, and click on Set Alarm, you'll see the message in the displayed message box.
 Saving the parts and connections
To ensure that you don't lose your work, select Save Part from the File menu.
Last modified date: 10/18/2019