Creating a leaf IC
In this first example, you create a single IC to contain both of the applications which compose the To-Do List program, IcTestModel and IcTestView. This IC will be startable, that is it will have the necessary system startup code to allow it to be executed as an application, independent from the development environment.
Now, create the IC. The following steps take you through the process. If you receive an error or other unexpected result, refer to Troubleshooting.
1. Select Browse Packaged Images from the Tools menu of the System Transcript window (or Packaged Images from the Tools menu of the Organizer) to bring up the Packager Control Panel.
2. On the Create New Instructions page, select VA Smalltalk start-up image component w/ windows. This is a default set of instructions for a leaf IC, that is an IC with window system startup code. If you want to create a leaf IC that includes system startup code without VAST parts behavior, you select IBM Smalltalk start-up image component w/ windows.
Enter IcTestLeafIcPackagingInstructions for the name of your packaging instructions. For more information on the Packager user interface and controls, see Advanced packaging.
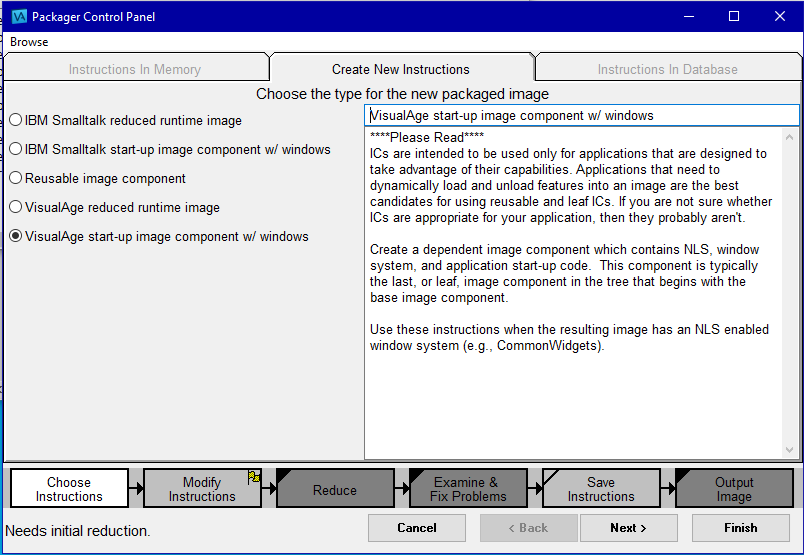
3. Proceed to the next step by selecting the Modify Instructions button at the bottom of the panel. There may be a brief pause as the next panel displays. This is because the packager is building its in-memory packaging control information from the selected packaging instruction.
4. Specify which applications you want packaged in your IC. The applications that are available to be packaged as part of the IC are in the left pane of the Applications and ICs page. In the middle pane are the applications and their associated ICs that are prerequisites for your VAST leaf IC. They will be loaded when your IC is launched.
 XD packaging of non-MVS leaf ICs which use MPRs at runtime
 When using the Packager UI (Modifiy Instructions :: Applications and ICs), you must manually add AbtNlsCfsSupportApp to the image that you are packaging as follows:
1. Select AbtNlsCfsSupportApp in the left pane.
2. Press the >> button. (It will be highlighted. There are two of these buttons. You want to press the one on the left that is below the left and/or center panes).
From the left panel select IcTestView and click on >> to cause it to be added to the IC. IcTestModel will be added automatically since it is a prerequisite of IcTestView. You should see the following:
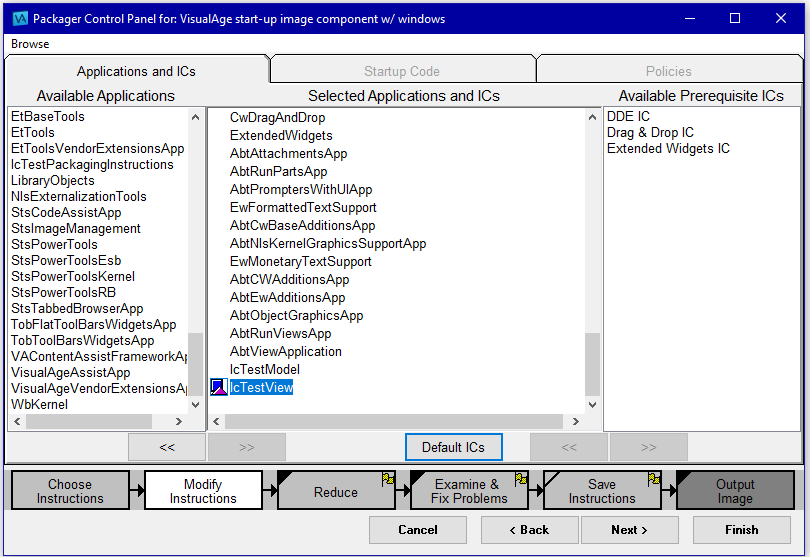

5. Note that the middle pane now lists a number of other applications in addition to the application you just added. These are applications that were added automatically by the packager because they are part of the prerequisite chain of IcTestView. At this point, if you attempt to continue with the Reduce step, all applications that appear in the middle panel with no associated IC will be included as part of the IC you are creating. This is not what you want since these other applications that were included automatically are VAST runtime applications and are available in ICs provided as part of VAST Platform.
To correct this situation, associate these other applications with their ICs. Do this by selecting the Default ICs button. Now scroll the list in the middle pane and you should see an IC associated with every application except for IcTestModel and IcTestView.
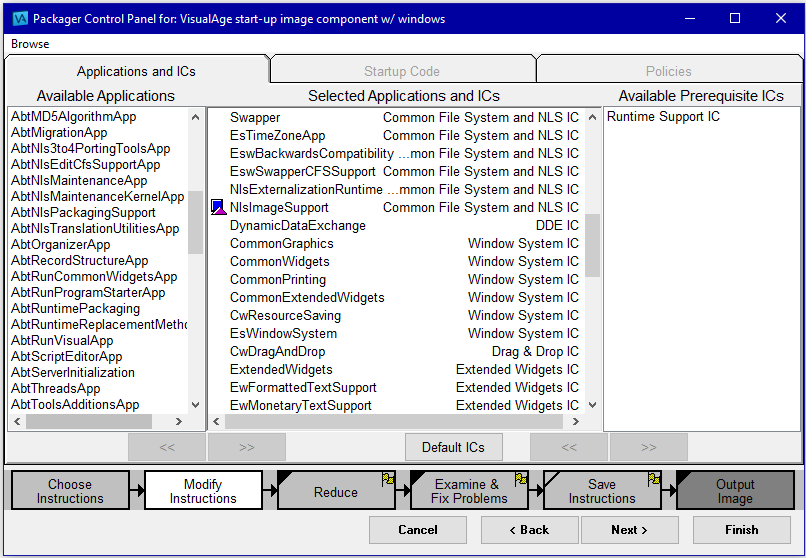

6. At this point, you can also check again that your prerequisites are correct by reviewing the list of additional applications in the center pane. It should include only those required by your application and all those included should have associated ICs listed. Two common errors resulting from stray or otherwise incorrect references in the applications that you are packaging are:
a. The inclusion of parts of the VAST development environment such as EtTools or any application prefixed with AbtEdit
b. Applications added by the packager with no associated IC listed
If you notice that either of the above situations has occurred, you should go back and check the prerequisite chain of the applications you are packaging, change references where necessary, and then start the packaging process again.
7. Next, you need to specify the startup code, which is the code that causes your initial view to be displayed. Select the Startup Code page and specify ToDoListView new openWidget.
Also, specify the name of the IC you are creating. Change the name of the Output File to ictest.ic.
Note:
Refer to Advanced Packaging for information on the interpretation of directory path information provided with your output file path specification.
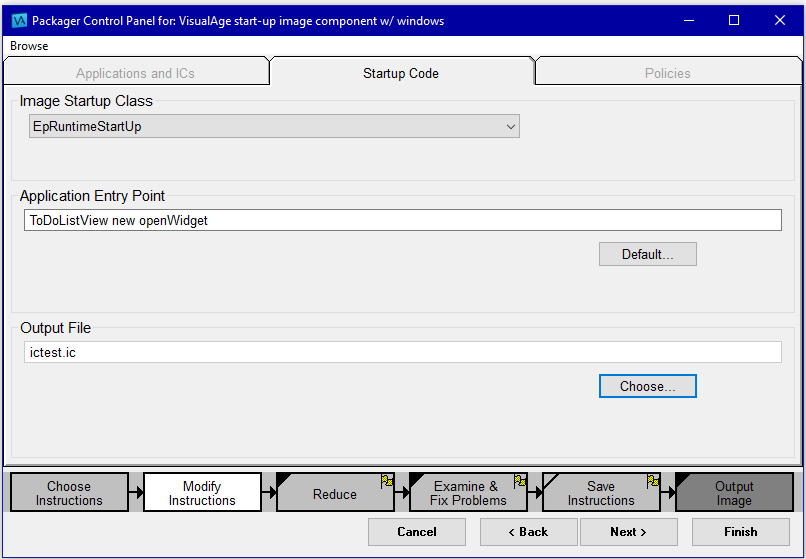
8. Create the IC. Select the Reduce button at the bottom of the panel. As you can see from the status bar at the top of the panel , this reduction step can take a sizeable period of time (the time displayed will vary, depending on the speed of the CPU).
When the reduction is complete, the status bar at the top of the panel will indicate the total elapsed time. Errors encountered during the reduction step are also listed. If you correctly followed the instructions to this point, you should have no errors. If you do have errors, see Advanced packaging for more information on resolving packaging errors and using the Examine & Fix Problems step. Also see to Troubleshooting for solutions to common errors.
During reduction, the packager interrogates the snapshot files associated with the prerequisite ICs you selected. It expects to find these snapshot files under the root of the filesystem directory tree specified by the "ini" file property "packagingRootDirectory". If you want to customize the "packagingRootDirectory" property, then you must ensure that you copy the required snapshot files to this alternate location.
On UNIX, it is sufficient to create a symbolic link (under your specified packaging root) to the directory containing the snapshot files you need.
9. Next, specify what you want done with the packaging instructions we've just created. Select the Save Instructions button of the Packager Control Panel. Enter the class name as IcTestLeafIcPackagingInstructions and the application name as IcTestPackagingInstructions and save the instructions. You can also select the Choose Application button and select your packaging instruction application from the list of applications displayed.
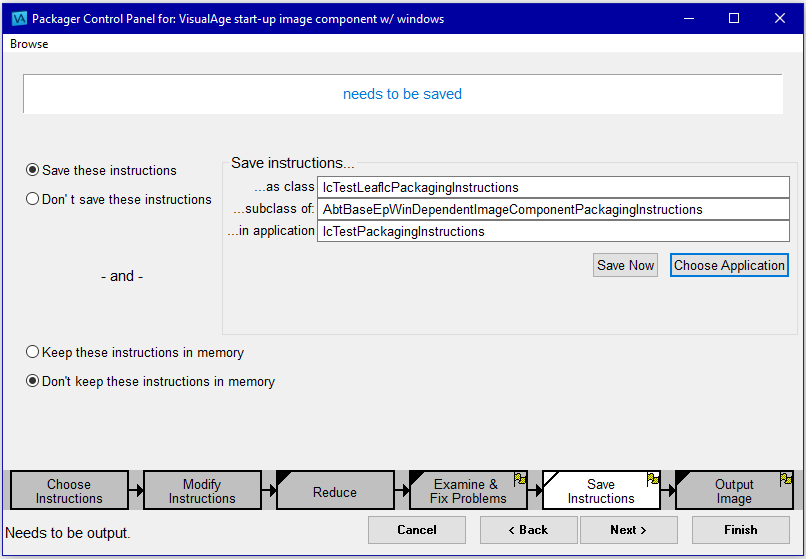

10. Now you're ready to create the IC file, ictest.ic. To do this, select the Output Image button. As indicated by the status panel, this operation can also take some period of time. This is because the packager is building the snapshot file and creating the IC data structures from their non-IC versions.
11. You can test the packaging by starting the IC as you would any other packaged VAST Platform program. The simplest way to do this is to put ictest.ini in the root VAST directory and use abt.exe to start it. This will allow you to test the IC without having to move other ICs on which it depends. If you are using Linux, be sure to copy your abt.ini to ictest.ini.
Ensure that cursors.obj and rgb.txt are in a path accessible to the IC. Then, at a system command prompt, switch to the VAST root directory and execute the following:
nodialog -iictest.ic -lictest.log
You use the -l parameter to specify a log file to record errors if any are encountered during the testing. A delay will occur which, depending on the speed of your machine, may reach a minute or two. This is because when starting an application from a "pure" leaf IC, versus a saved image or .icx file, the VAST runtime environment is loading and binding together all of the ICs which compose the application. After the ToDoListView is displayed, try adding and deleting items in the list to test the application.
12. To reduce the startup time, you can cause your application's image to be saved by starting it instead with the following:
abt -iictest.ic -seictest.icx -lictest.log
This causes the To-Do List program in ictest.ic to start, all the prerequisite ICs to be loaded and bound, the state of the image after the ICs are loaded and bound to be written out to ictest.icx, and the program to terminate. After this is done, starting the To-Do List from ictest.icx takes considerably less time
Now, look at some more involved examples.
Last modified date: 01/18/2024