Progress bars
A Progress Bar is a visual indicator that uses a rectangular bar to show the passage of time. The bar gradually fills from left to right. You can use it to indicate to a user how a time-consuming operation is progressing.
A progress bar has minimum, maximum, and value properties. The minimum and maximum properties define the range of an operation, the operation on which you wish to report progress. The value property defines a point within the range and by doing so, specifies the operation's progress. For example, a progress bar with minimum of 0, maximum of 10, and value of 5, indicates an operation that is 50% complete. You convey status to a user of your application during a time consuming operation by incrementing, decrementing, or setting the value of the value attribute. This causes appropriate changes in the filling of the progress bar.
Note that the values of a progress bar's properties are meaningful only within the context of your application. That is, you define a meaningful range based on some identifiable characteristic of the operation on which you wish to report progress. For example, suppose you wanted to programmatically set the version of every class you own in the image to some common value. To use a progress bar to report progress of this potentially lengthy operation, you might first query the number of your classes and set the minimum of a progress bar to 0 and the maximum to the number of classes. The script you would write to perform this operation would then increment the value of the progress bar after it completed the re-versioning of each class.
Let's continue with our example to see how you can use a progress bar and a track bar. We will define a simple script to count half-second intervals. The user of our part specifies, through the use of a track bar, how many of these intervals to count. The user sees progress of the counting operation by means of a progress bar.
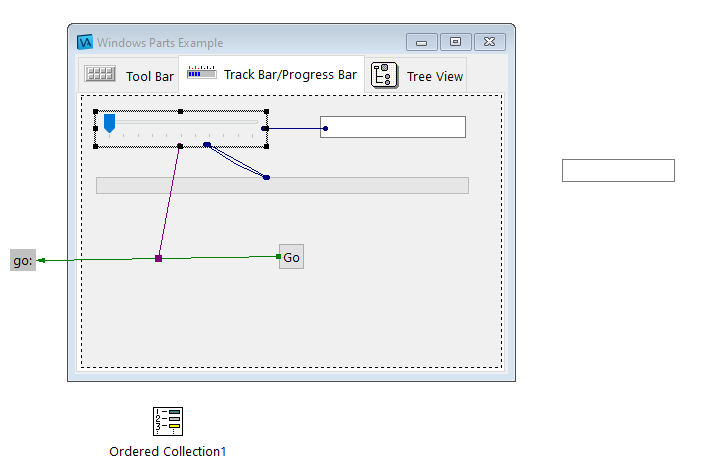
In the Composition Editor, select the Track Bar/Progress Bar tab of your tab strip to cause this page to be brought forward. On this page, drop a Track Bar, Text part, Progress Bar, and Push Button. Name the progress bar Progress Bar and the push button Push Button. Change the label on the push button to Go. Next, open the settings of the track bar and set the following attributes:
increment
1
maximum
100
minimim
0
tickFrequency
10
Finally, make some connections:
• Connect the value attribute of the track bar to the object attribute of the Text part.
• Connect the minimum attribute of the track bar to the minimum attribute of the progress bar.
• Connect the value attribute of the track bar to the maximum attribute of the progress bar.
As the user of our part moves the track bar, these connections will cause the range of the progress bar to be set appropriately.
Define the following method to perform the counting. This method will be invoked by the push button.
go: numberOfIterations
| d |
(self subpartNamed: 'Push Button') disable.
d := Delay forSeconds: 0.5.
0 to: numberOfIterations do: [ :n |
d wait.
(self subpartNamed: 'Progress Bar') incrementValue].
(self subpartNamed: 'Progress Bar') value: 0.
(self subpartNamed: 'Push Button') enable
This method first disables the push button, then counts the number of half-second intervals defined by the value of the track bar, resets the progress bar, and finally enables the push button.
Finally, make some connections:
• Connect the clicked event of the push button to the go: script.
• Connect the value attribute of the track bar to the parameter of the event-to-script connection.
The part should now look something like this.


Test it again. Try moving the track bar and note the changing values in the Text part. Select a value greater than zero and click on Go. Watch the progress bar fill in until the operation completes and then reset by clearing.

In addition to the action incrementValue, the progress bar also implements the actions incrementValueBy: to increment its value by something other than 1, decrementValue to decrement its value by 1, and decrementValueBy: to decrement its value by something other than 1.
In this section, we used a track bar to have a user of our part select a value from a range we had defined; a maximum of 100 is enough since we didn't include a cancel button. We then performed an operation to report status through a progress bar. The range we defined for the progress bar was the number of counting operations we knew, in advance, would be counted.
Last modified date: 11/02/2021