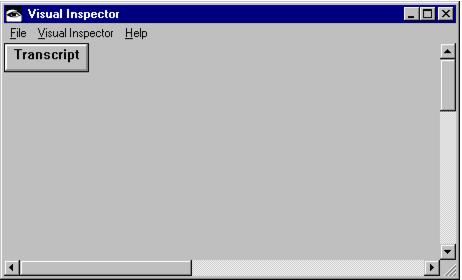
The Visual Inspector™ is a utility provided by Instantiations, Inc., and it comes with full source when you buy GF/ST. It is a learning tool, a productivity tool, and a better inspector, and we believe it will be a valuable addition to your Smalltalk environment. It provides a graphical presentation of any objects in Smalltalk, showing the relationships between them and allowing you to modify them directly.
You can start the Visual Inspector from the GF/ST launcher. Alternatively, you can send the message psiVisualInspect to any object. Consult the README file for specific information about hooking the Visual Inspector into base image “inspect” menus.
When you click on the Show non-nil handle, the object display changes to show all non-nil instance variables:
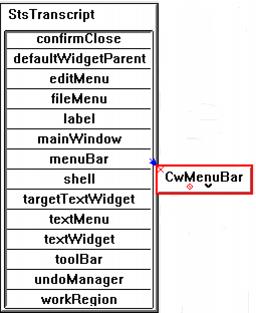
The red x to the left of each entry will remove the insZVar from the list. The black dot to the right of each entry will inspect the InstVar. Notice that the Hide all handle now shows up, too. Only the views instance variable of the Transcript is non-nil. If you want to see the others, click on the Show all handle to expand the list. The Show none handle brings it back to the original display. The Visual Inspector always shows the instance variables in sorted order. The little Inspect handle on the right of the instance variable name will open another object in the same Visual Inspector window and indicate the relationship between the objects:
In this case, the kind of object you have added is an CwMenuBar; i.e., the Transcript holds onto an instance of CwMenuBar in its menuBar instance variable. If you expand the menubar to show its instance variables and then inspect the menus instance variable, you will see:
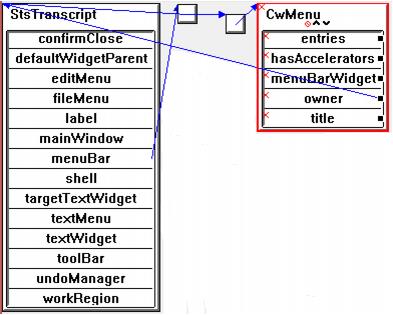
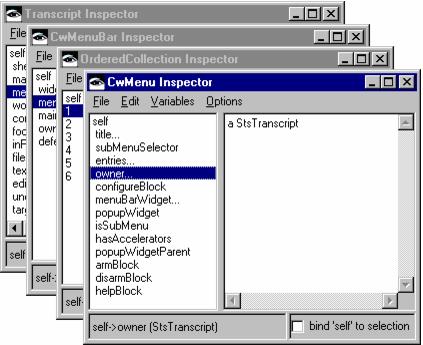
OrderedCollections do not have named instance variables, so when you select the Show non-nil handle on it, you will see the indexes in the collection that holds onto non-nil objects. If you, in turn, inspect it, you will eventually see the following:
Now, you can instantly tell that the CwMenu’s owner is the Transcript. Expanding the display further (and using the
Display ⇒ Collapsed pop-up menu), you can see the basic relationship between a Transcript, its MenuBar, and any Menus. In this case, the Transcript holds onto a menubar, an instance of CwMenuBar. The MenuBar’s owner is the Transcript. The MenuBar holds onto a collection of menus, instances of CwMenu. The CwMenu’s owner is the Transcript as well.
Display ⇒ Collapsed pop-up menu), you can see the basic relationship between a Transcript, its MenuBar, and any Menus. In this case, the Transcript holds onto a menubar, an instance of CwMenuBar. The MenuBar’s owner is the Transcript. The MenuBar holds onto a collection of menus, instances of CwMenu. The CwMenu’s owner is the Transcript as well.
“). However, when you already have several objects in the display, it is very simple to make an instance variable of one object hold onto another object. To reassign an instance variable, just hold down the left mouse button on the Inspect inst var handle on the right side of a field, and drag over to another object.
Scale - A submenu displaying a set of predefined scales is displayed, ranging from 25% to 200%.
Zoom In - Increase magnification by 10%.
Zoom Out - Decrease magnification by 10%.
Add Object... - A prompter will appear. Type in a Smalltalk expression to be evaluated, and the resulting object will be placed in the Visual Inspector.
Delete Selections - Delete all selected objects from the display. Select multiple objects by rubber-banding completely around them.
Update - Update the display in the Visual Inspector.
Set Font... - A standard dialog will appear, allowing you to choose the font used in the Visual Inspector.
Set Selection Color... - A standard dialog will appear, allowing you to choose the color to indicate the selected object in the Visual Inspector. The default color is red.
Print - Print the display. What-you-see-is-what-you-get (WYSIWYG) printing is disabled for the free version of the Visual Inspector, but it is available to owners of GF/ST.
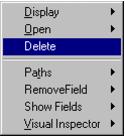
Paths - The submenu allows you to change all paths showing object connectivity to use straight lines with and without arrowheads, or orthogonal lines with and without arrowheads.
The Delete option is the same as pressing the red “x” handle in the upper left corner of the object. The submenus provide access to different display modes for objects and let you open other inspectors.
The Display menu lets you modify the default way an object displays in the Visual Inspector. By default, the class of the object is shown, and the full set of inspecting abilities are enabled, such as being able to show instance variables. You can also collapse the object to a tiny box, or display it as any arbitrary string in a box. Alternatively, you can keep the full range of inspecting options available, but change the title on the box.
Collapsed - Display in Collapsed mode. The object will show up as a small square box and cannot be expanded to show instance variables. Connecting objects will still be connected to the Collapsed display version.
As String - Display the “printString” result for the object. The resulting display cannot be expanded to show instance variables. Connecting objects will still be connected to the As String display version.
Full - Display in the Full mode, with a title of your choice (the class name is the default) and with access to the instance variables via handles or the pop-up menu.
Title - When using the “Full” display mode, the Title submenu lets you modify the title at the top of the object display. You will still have access to the object’s instance variables.
Visual Inspector - Open a new Visual Inspector on the object. This option would be the equivalent of sending the message psiVisualInspect to the object.
Standard Inspector - Open a standard inspector on the object. This option would be the equivalent of sending the message inspect to the object.
Basic Inspector - Open a standard inspector on the object. This option would be the equivalent of sending the message basicInspect to the object.
Class Browser - Open a class browser on the object. This option would be the equivalent of sending the message browse to the object.
The Remove Field menu contents shows the instance or indexed instance variables which are currently showing. If no instance variables are showing for the object, the menu option will be disabled. When you select a field, the instance variable is deleted from the list. Choosing a field from the submenu is the same as clicking the red “x” at the left edge of the list.
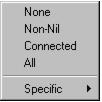
None - Show no fields.
Non-Nil - Only show fields that are not nil.
Connected - Show only the fields that are connected to other objects in the display.
All - Show all fields.
Specific - Show a submenu with all fields not currently being displayed. Selecting an item from the submenu will add it to the current list.
When you use the pop-up menu on a specific object, this menu is the same as the pull-down Visual Inspector menu.
